
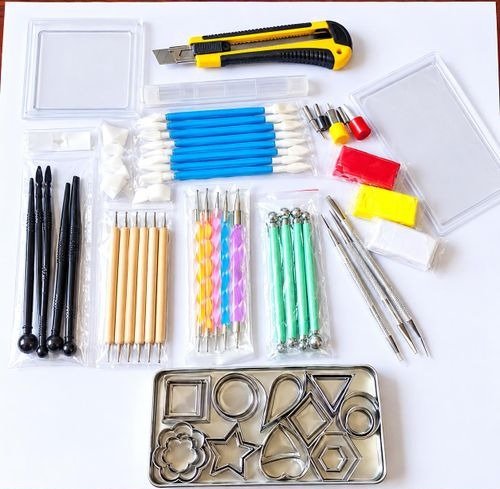
You do not need expensive equipment to create beautiful polymer clay earrings, jewellery, miniatures, and decorative pieces. With a few affordable tools and some everyday household items, you can start making professional-looking clay creations without spending a fortune.
Whether you are a beginner or an experienced artist trying to reduce your expenses, the secret is knowing which tools are essential, which ones you can replace, and which ones can wait until your business grows.
1. Essential tools for working with polymer clay
Before buying specialised equipment, focus on the tools you will use in almost every project.
Acrylic roller: An acrylic roller helps you flatten polymer clay evenly before cutting or shaping it. A smooth, non-stick surface is ideal because it reduces marks and makes the clay easier to work with. A dedicated acrylic roller is a worthwhile investment, but a smooth glass roller designed for crafting can also work.
Craft knife: A sharp craft knife is useful for cutting clay, trimming uneven edges, and creating precise shapes. Choose one that feels comfortable to hold and replace its blade when it becomes dull.
Cutting surface: You need a smooth, non-porous surface that will not leave unwanted marks on your clay. A dedicated craft tile or glass work surface is a practical choice.
Clay conditioning tools: Conditioning means kneading and working the clay until it becomes soft and pliable. Your hands can handle small amounts, although an acrylic roller makes the process easier. A pasta machine designed for crafting can be added later if you regularly work with large quantities.
2. Affordable alternatives to expensive clay tools
You can save money by using suitable household items instead of purchasing every specialised tool available.
For example, a smooth glass jar can serve as a roller if it is clean, sturdy, and free of chips or cracks. Toothpicks can help create small holes, texture, and fine details, while wooden skewers can assist with shaping certain designs.
Old plastic cards can help smooth surfaces and remove excess clay from a work area. Small silicone tools used for other crafts may also work for blending edges and adding details, provided they are clean and suitable for the task.
However, not every household item is appropriate for polymer clay. Avoid tools that may transfer ink, paint, dirt, or other contaminants onto your work. Never use food preparation tools that will later come into contact with food.
The goal is to find affordable substitutes that perform the same function without compromising the quality or safety of your finished pieces.
3. Tools for cutting, shaping, and adding details
Once you can condition and flatten your clay, you need tools to turn it into finished designs.
Clay cutters: Metal or plastic cutters make it easier to produce consistent shapes for earrings, pendants, charms, and other accessories. Beginners can start with a few basic shapes instead of purchasing large cutter sets.
Needle tools: A needle tool or a suitable fine-point tool helps create holes, draw lines, and add small details. It is particularly useful when making jewellery that requires holes for jump rings or other findings.
Sculpting tools: Basic sculpting tools help shape miniature objects, smooth edges, and create textures. You do not need a large professional set at the beginning. A few tools with different tips can handle many common tasks.
Texture tools: Texture adds character to polymer clay designs. You can use textured fabric, lace, stamps, or other clean objects with interesting surfaces to create patterns. Test unfamiliar materials on scrap clay first to check that they release cleanly.
Buy tools according to the projects you actually make. An artist who creates simple earrings will need different equipment from someone who specialises in realistic miniature food or detailed sculptures.
4. Essential tools for baking polymer clay safely
Polymer clay must be cured according to the manufacturer’s instructions before it becomes a finished, durable piece. This makes baking equipment one of the most important parts of your toolkit.
A dedicated oven: A small toaster oven can be a practical option for artists who work with polymer clay regularly. Use it in a well-ventilated area and follow the manufacturer’s recommended curing temperature and time.
Oven thermometer: An oven thermometer helps you check whether your oven maintains the correct temperature. Household ovens can fluctuate, and excessive heat can scorch or burn polymer clay.
Baking surface: A suitable ceramic tile or other manufacturer-approved baking surface can support your creations during curing. Check the clay manufacturer’s instructions before selecting a surface.
Oven-safe supports: Some projects need support to maintain their shape while baking. Use only heat-safe materials that are compatible with the clay and the recommended curing conditions.
Never exceed the temperature specified by the clay manufacturer. Overheated polymer clay can release irritating or harmful fumes. Keep your workspace ventilated, avoid direct contact between clay and food, and do not use food utensils for clay preparation. If you use an oven for polymer clay, dedicate it to crafting rather than food preparation.
5. Tools for sanding, polishing, and finishing clay projects
Finishing is what makes a handmade piece look neat and ready for sale.
Wet-and-dry sandpaper: Fine-grit sandpaper can smooth rough edges and minor imperfections after curing. Use it wet where appropriate to reduce airborne dust, and follow the clay manufacturer’s finishing recommendations.
Craft polishing tools: Soft cloths can help clean finished pieces. For artists who want a higher shine, suitable polishing equipment may be useful as their production increases.
Small files: Fine files can help refine edges and hard-to-reach areas on cured pieces. Choose files suitable for the material and finish you are working with.
Jewellery pliers: If you make polymer clay earrings, necklaces, or keychains, small jewellery pliers help open jump rings, attach findings, and assemble finished accessories.
You do not need to purchase every finishing tool immediately. Start with basic sanding supplies and the assembly tools required for your chosen products.
6. Optional tools worth buying as your skills improve
Some tools can make production faster and more consistent, but they are not necessary for every beginner.
A pasta machine can help condition clay and produce evenly rolled sheets. A clay extruder can create consistent ropes and decorative shapes. A drill designed for small craft projects may help with certain cured pieces, while specialised cutters and moulds can expand the range of designs you produce.
A rotary tool may also be useful for advanced finishing, but it requires appropriate safety precautions and is not essential for most beginners.
Before buying any of these tools, consider how often you will use them. If a tool only serves one occasional project, it may be more economical to use a suitable alternative until demand justifies the purchase.
7. How to build a polymer clay tool kit on a small budget
The easiest way to control your spending is to buy tools in stages instead of trying to create a fully equipped studio immediately.
Start with polymer clay, an acrylic roller or suitable alternative, a smooth work surface, a craft knife, a few basic cutters, a needle tool, and access to appropriate baking equipment. Add sandpaper and jewellery pliers if your projects require them.
As your skills improve, invest in tools that solve recurring problems. If you frequently struggle to achieve even thickness, a pasta machine may be worthwhile. If you produce large quantities of earrings, additional cutters may help you work faster and maintain consistent shapes.
You should also set aside money for consumables such as clay, blades, sandpaper, and jewellery findings. These supplies are easy to overlook when planning a budget, yet they directly affect your ability to complete orders.
Most importantly, prioritise quality where it matters. A reliable cutting tool, a suitable work surface, and accurate temperature control can be more valuable than a large collection of inexpensive tools you rarely use.
Conclusion
Starting a polymer clay craft does not require a large investment. With a few essential tools, affordable alternatives, and safe baking equipment, you can create attractive handmade products while keeping your costs under control.
Buy what you need for your current projects, learn to use each tool properly, and upgrade only when your work demands it. This approach helps you protect your budget while building the skills and equipment needed to grow as a polymer clay artist.